
The API to access the camera is not part of Xamarin Forms, which is fair enough, as Xamarin Forms is about the UI, not peripheral access. Peripheral access is provided by the Xamarin Essentials package.
Access to the camera, via the MediaPicker was included in version 1.6 of Xamarin Essentials, which, at the time of writing, is pre-release. If you want don’t want to work with the pre-released version, then you can load the XAM.Plugin.Media package to access the camera.
To access the camera with the Media package is really easy. It is just a couple of lines of code.
       private async void OnCameraBtnClicked(object sender, EventArgs e)
        {
            _photo = await MediaPicker.CapturePhotoAsync();

            if (_photo != null)
            {
                var stream = await _photo.OpenReadAsync();
                PhotoImage.Source = ImageSource.FromStream(() =>
                {
                    return stream;
                });
            }
            SaveBtn.IsEnabled = true;
        }
The above code is triggered from the Click event from a Button on the UI. The UI also contains an Image view (Control) which is used to display the captured image.
On both Android and IOS you need to request permission to access the camera.
IOS Camera Permissions
On iOS permissions are requested by adding entries into the Info.plist file. For Camera access you need to include a NSCameraUsageDescription entry.
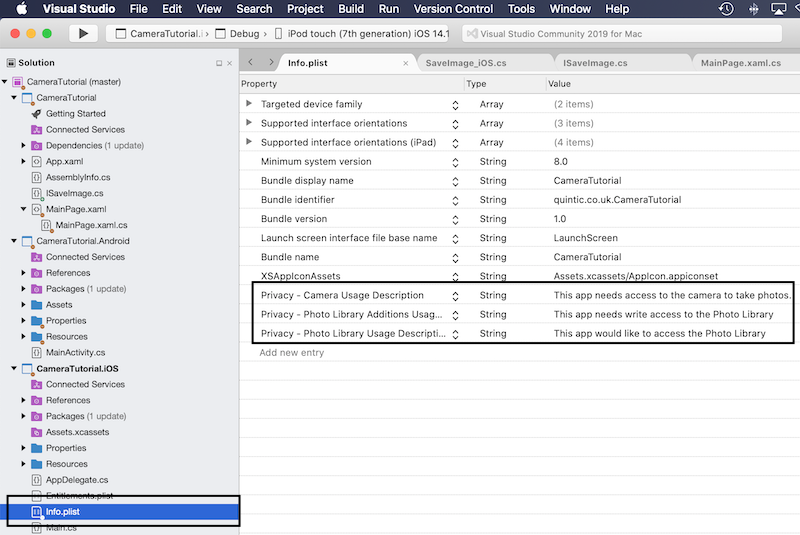
The image above shows three entries added for this app. The first requests access to the Camera. The other two are for Read and Write access to the Photos or Camera-Roll folder on the iOS device.
Access Camera Roll / Photo area.
To save the image to the Camera Roll area is not quite as simple a task as taking a picture with the camera. There is, as yet, no device abstracted mechanism within Xamarin for writing to the file system, and to save the image to the camera roll that is basically what you are doing.
You, therefore, have to write some device specific code, and then trigger a Dispatcher to execute the code.
The first task is to write an Interface in the PCL which you will develop an implementation of on the device specific projects.
using System.IO;
using Xamarin.Forms;

namespace CameraTutorial
{
    public interface ISaveImage
    {
        void SaveImageToCameraRoll(Stream stream);
    }
}
Then in the device specific projects:
using System;
using System.IO;
using Xamarin.Forms;
using Foundation;
using UIKit;

[assembly: Xamarin.Forms.Dependency(typeof(CameraTutorial.iOS.SaveImage_iOS))]

namespace CameraTutorial.iOS
{

    public class SaveImage_iOS : ISaveImage
    {

        public void SaveImageToCameraRoll(Stream stream)
        {
            var imageData = NSData.FromStream(stream);
            var image = UIImage.LoadFromData(imageData);
            image.SaveToPhotosAlbum((img, error) =>
            {

            });
        }
    }
}
You then need to add the following keys to the Info.plist file (see image above):
And that code wise is it Full project available here.
Deployment Issues
Fails to deploy
Whilst the above code is sufficient to take a picture and save it to the Photo area, there were a number of deployment issues.
The first problem was it not deploying. Instead it eventually timed-out with the message:
xamarin ios waiting for debugger to connect on port 10000 via usb
One reason this can occur, is if you redeploy the XCode dummy version, and then redeploy the VS version, without changing the VS code. i.e. re-deploy an already deployed version. The deploy fails as evidenced by ICON on the iPad remaining the XCode icon as opposed to the Xamarin icon.
Another (possible) reason may be caused by trying to deploy a release build instead of a debug build. As I said no evidence, but I suggest always sticking to Debug builds when developing and loading direct.
The only solution I found to this issue was to:
- Remove the App from the device
- Re-install the X-Code version
- Delete the obj and bin directories.
- Execute a Build>Clean All
- Re-build and deploy.
If the above doesn’t work, then inject a Shut-down and restart device step after removing the App.
Privileged Access setting not updating
What appears to be the issue is that for the App to modify it’s Access Permissions on iOS devices, you need to delete existing versions of the App from the device before deploying with the modified Permissions.
I say Appears to be the issue, because I do not have concrete proof. However having develop the App initially to just access the camera, when I tried to extend to get access to the Photo area, it always failed with Illegal Access and the App on the iPhone did not have the Photos access request under its settings. And I have to say I was pulling my hair out as to what the problem was.
However, after I encountered and resolved the ‘Not Deploying’ issue mentioned above, the App had all its requisite permissions and began working.