
Introduction
A friend on mine venerable windows File Server of 23 years gave up the ghost the other day – power supply / motherboard communication issues. And as my friend said – it isnt really worth looking to fix it, not with component sof that age. So, knowing that i used raspberry Pi for my Web and Email server he asked me about using a raspberry Pi as a NAS.
Well I must admit, my experience of using the Pi as Web & Email servers is great. They are stable, reliable, easy to upgrade, not power hungry, and take up no room. So I though why not. Let’s investigate.
A quick search on the Pi sites came up with OpenMediaVault. This is a Debian based NAS available for x86-64 and ARM platforms, and, more importantly, there are detailed instructions on installing on a RaspberryPi here
So, I thought I would give it a go. I had a spare Pi4 and a 120Gbyte SSD lying around. What a perfect way to spend a Sunday afternoon.
And at this stage I wish to ackowledge and give credit to Patrick Fromget whose installation instructions here I followed and found to be extremely good.
Setting up Pi
Creating Image
The Raspberry documentation on installing OMV notes that OMV will nolonger install on an O/S with a GUI – so it’s terminal time, and that means removing the existing O/S on my Pi4 and replacing it iwth Lite.
These days though this is a piece of cake.
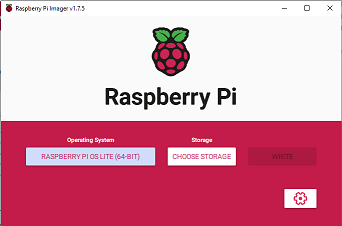
- Install Raspberry Pi Imager on PC.
- Stick SD card into a USB adapter and insert into USB port.
- Fire off Raspberry Pi Imager – select Sd card and Pi OS LITE (64 bit)
Now more experienced Pi’ers would have said “Click on the settings button” I didn’t, but we will come back to that later.
This created the image. Insert into Pi, and fire it up.
All worked OK except I am using a TV screen as my monitor, and the Pi seems to think its screen is bigger in both width and height, as a consequence I could not read the current line or the first 3 characters of every line that I could see. Tried raspi-config to see it I could adjust screen size / resolution, but no go when using a TV screen with HDMI. Bit of a pain, but then all I needed to do was set up WiFi & SSH and I could then resort to PUTTY.
Setting up WiFI & SSH
Quick check on the internet on setting up WiFi using terminal only – that was when I relased that the Settings Button on RapberryPi Imager allows you to, amongst other things, set-up Hostname, WiFi, SSH, and Users as part of the image creation process. Oh well – you live and learn. In the meantime its back into
- raspi-config
- System Options
- Wireless LAN – Enter SSID and passphrase
- Interface Options
- Enable SSH
Entered SSID and password/passphrase. I also set the hostname at the same time; exited and then a quick: ifconfig wlan0 to check IP address. No IP address. Checked the file /etc/wpa_supplicant and the correct entry was their. However I had entered the SSID in lowercase. Now I have always selected the Wifi SSID from a drop-down, so I had not realised that SSIDs were Case Sensitive
Reboot
I now have an IP address and can open up Putty on my PC and connect.
Adding SSD Drive
OpenMediaVault
Installing
OMV is not available as a package as in sudo apt get omv does NOT work. However they do provide a script to download and install
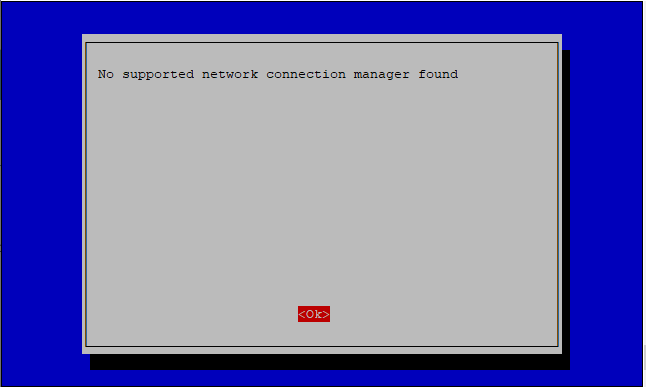
wget -O - https://github.com/OpenMediaVault-Plugin-Developers/installScript/raw/master/install | sudo bashExecuted the above script and OMV did install. It took about 10 mins, and the end it executes a reboot. All well and good, except no network connection. Tried to use raspi-config to reset the WiFi and recieved a “No supported network connection manager found” error.
My first thoughts were I had screwed it up with the SSID being incorrect case, so I re-imaged the SD card and reloaded OMV. Only took 15 mins so no big deal, and this time I set Hostname, SSID, and SSH within the Pi Imager.
Result however was the same. Quick search using Duck Duck Go brought up a number of reports about the same issue on the OMV support web site. However these reports were from 2020 – 3 years ago. I couldn’t imagine that the problem had persisted for this length of time.
I did wonder if it was a WAN vs LAN issue, but a couple of the reports mentioned the same problem with LAN set-ups. Luckily one response suggested running omv-firstaid. Now there were no further details, and the person who reported the issue said that omv-firstaid didn’t help, but i thought I would give it a go.
omv-firstaid is a bit like raspi-config, except each action is a one-off.
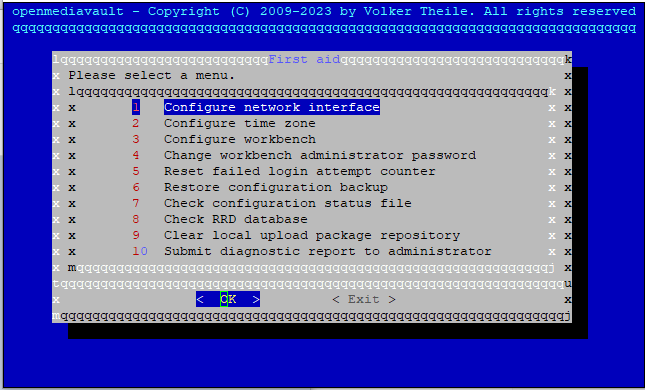
However option 1 allows you to configure the network interface, and within this you can set-up LAN or WAN or both. With the WAN set-up, checked ifconfig wlan0 and we had an ipaddress. So now I could login using Putty.
Configuration
Configuring OMV is a bit more long-winded than I had thought, but as long as you follow the instructions it is not complicated. All the configuration is via the
OpenMediaVault
Detailed instructions here
Step:
- Install Raspberry Pi Imager
- From Imager select Raspberry Pi OS Lite – Doesn’t have a GUI. All Terminal based.
- Use the Setting options to
- Name Pi device
- Allow SSH (For Putty)
- Set WiFi SSID & password (if WiFi required)
- Write Image to microSD card.
- Insert card and start Pi.
- By using the Pi Imager you probably have the latest everything, but still worth doing
sudo apt update && sudo apt upgrade
- Install OpenMediaVault –
wget -O - https://github.com/OpenMediaVault-Plugin-Developers/installScript/raw/master/install | sudo bash - At this point Network will have been lost. (At least if WiFi it will have been)Need to:
- sudo omv-firstaid
- re-instate network
- Also good idea to re-set admin password
- Check network working – ifconfig – should have an IP address
- Attempt to login-in to OpenMediaVault Workbench by:
- http://hostname or ip address/
- User: Admin
- Passsword: openmediavault – unless changed earlier (MINIalfa)
- Hopefully the workbench web-site will be up and running. If so we now need to:
- Add Users (openmediavault does not use the system users)
- Settings>Users – Click Add
- Configure the Shared Drive
- Storage>Disks – Ensure the disk you want it visible.
- Storage>File Systems – Click create
- Choose your device and the file format (ext4)
- Storage>Shared Folders – Create Folders and give required permissions
- Configure the Services
- Services>SMB/CIFS
- Click the Enable Checkbox at top of screen
- If you want set the Workgroup to match Windows – though this doesn’t seem to make much difference
- Service>Shares – Selected the Folder(s) created above and Enable Sharing
- Add Users (openmediavault does not use the system users)